Automation for the work behind the work.

Run the day.Lose the busywork.

Daily UMS automates hours and salary calculations, project coordination, safety procedures and equipment issuance. Save time, reduce manual mistakes and keep every action easy to track.

Made for: staffing and recruitment agencies, construction, industrial/manufacturing companies, facility and cleaning services, transport and logistics, and any business experiencing a high influx of employees.

Daily UMS workspaceDocuments

From employee details to ready-to-use documents.

Keep templates, languages and document packs together. Generate the paperwork that moves your people forward.

Trusted by teams across the Baltics

BouwPro
CB Baltic
CB Construction
OTK Baltic
Passer SIDC
Passer SIDC Group
Passer SIDC Projects
WE Rabota
SIDC Civil
WE Praca
Built for foreign-labour employers

Work permits, expiry dates and next steps in view.

Keep important work-permit and residence-permit information with each employee record. Daily UMS sends reminders when passports and residence permits are nearing expiry, and notifies your team about new safety tasks.

  • Work-permit and residence-permit tracking
  • Passport and residence-permit expiry reminders
  • Notifications about new safety tasks
One system. Fewer manual steps.

Automate the routine.
Keep control of the result.

Enter information once and let it flow through planning, calculations, documents and records. Managers save time while every update stays visible and traceable.

01 / Hours + pay

Hours become ready calculations.

Daily UMS totals time, applies weekday, weekend and overtime rates, and includes bonuses and deductions for clear salary preparation.

  • Automatic hour and rate totals
  • Bonuses and deductions with notes
  • Excel import and export
02 / Projects

Projects stay coordinated.

Build the weekly plan around people, clients and work locations. Keep housing, vehicles and route details connected to the assignment.

  • Weekly workforce planning
  • Clients, projects and locations
  • Housing, cars and mapped routes
03 / Safety

Safety becomes a digital process.

Issue instructions, run tests and collect signatures digitally. See missing actions before they become a compliance gap.

  • Digital material and knowledge tests
  • Electronic confirmations
  • Incidents and follow-up actions
04 / PPE + tools

Every handover has a record.

Issue PPE, tools and inventory to the right employee, capture acknowledgement and find the full history when something changes.

  • PPE and equipment issuance
  • Employee signatures
  • Searchable issue history

Routine documents,
already in motion.

Reuse the employee data you already hold. Daily UMS fills templates, organises language versions and generates complete document packs, cutting repeated entry and keeping the result attached to the right person.

Explore document automation
Multilingual teams, included.
ENLTRUAZ
The system supports multiple languages. Each organisation can add the additional languages its international workers use.
Employee onboarding

One record.
A ready document pack.

Employee details flow into every required file.

Work contractEmployee details, inserted
PPE issue orderEquipment linked to the employee
Safety confirmationSignature evidence retained
TemplatesLanguagesPacks
A connected onboarding workflow in Daily UMS

Easy to set up.
Ready for your way of working.

Bring your employee data, choose how to organise it and get personal help with onboarding. We help you set up Daily UMS around your team’s needs.

Import your employees from Excel

Start with the employee information you already have. Import an Excel file to bring your team into Daily UMS without entering every record again.

Use our forms. Or build your own.

Use the built-in worker database form or create custom forms for the information your organisation needs to keep.

Get help from the start

We are ready to help with setup and guide your team through the system, with onboarding tailored to your organisation’s needs.

Have a more specific requirement?

We can build custom modules and accommodate special workflows. Scope and pricing are discussed and negotiated individually for each case.

Talk to us about custom needs
Tutorials

See how it works

Short walkthroughs and screenshot guides you can follow at your own pace.

Human Resources · 8 walkthroughs

One page. One clear guide.

Large-screen captures from the presentation tenant. Short English captions, focused views and a screenshot PDF for every HR page.

Complete HR PDF guide ↗

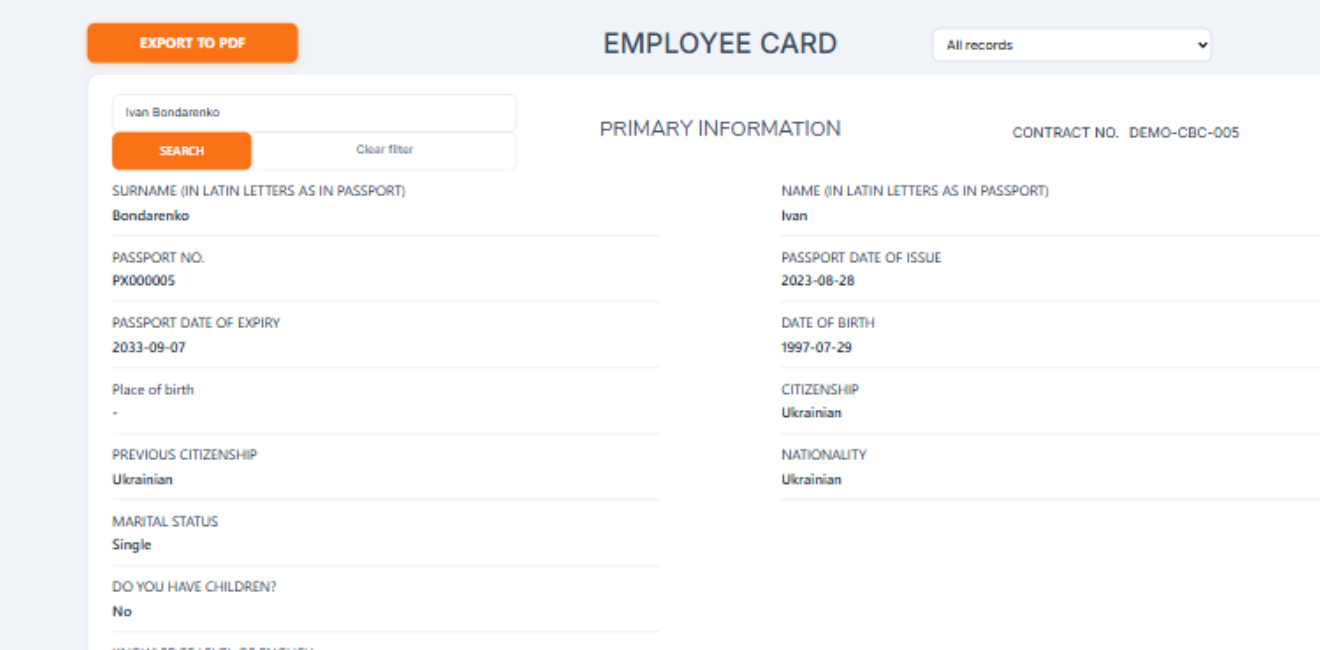
Employee Card

Find a person, review their profile and export a PDF.

1080p

1920 × 1080 · English · Captioned screenshot walkthrough · No audio
Emma Demo Manager · Presentation tenant · Captured 13 October 2026

Read the steps here
  1. Choose the record source

    Open Human Resources > Employee Card. All records includes people added manually, imported from Excel or collected through forms. A form selection limits the people available in search. The number beside a form is its record count.

    Choose the record source: captured UMS screen
  2. Select the search suggestion

    Start typing the first name or surname. Select the actual autocomplete result, such as Ivan Bondarenko, before pressing Search. Typing text alone does not select a different employee. Check the name and contract number on the loaded card.

    Select the search suggestion: captured UMS screen
  3. Read the main profile

    The card presents the stored information for the selected person. Review primary information, contract number, passport dates, citizenship, profession, language and residence address. Empty fields and sections may be omitted, so cards can differ in length.

    Read the main profile: captured UMS screen
  4. Review the remaining sections

    Scroll down to review the available travel and visa information, contacts, next of kin, education, employment records and additional personal information. This is a reading view; change employee data through Employee Database.

    Review the remaining sections: captured UMS screen
  5. Export or reset

    Return to the top and choose Export to PDF for a printable copy of the selected card. Check the selected employee before exporting. Use Clear filter to reset the lookup, or choose another autocomplete result and Search. The walkthrough shows the controls; it does not reproduce an exported employee document.

    Export or reset: captured UMS screen
Planning · 6 walkthroughs

Plan every week with confidence.

Animated walkthroughs from the presentation tenant. An orange cursor shows exactly where to click, with short English captions and a screenshot PDF for every Planning page.

Complete Planning PDF guide ↗

Project Planning

Plan workers per day, manage clients, projects and rates, copy plans and export reports.

1080p

1920 × 1080 · English · Animated walkthrough with cursor highlights · No audio
Emma Demo Manager · Presentation tenant · Captured October 2026

Read the steps here
  1. The weekly plan

    Open Planning > Project Planning. Each row is one worker; the left part holds personal and document data, the right part has one cell per day from Monday to Sunday. Weekend columns are shaded. The orange bar shows the current week number, and the TOTAL DATA buttons open the master-data editors used by the day cells.
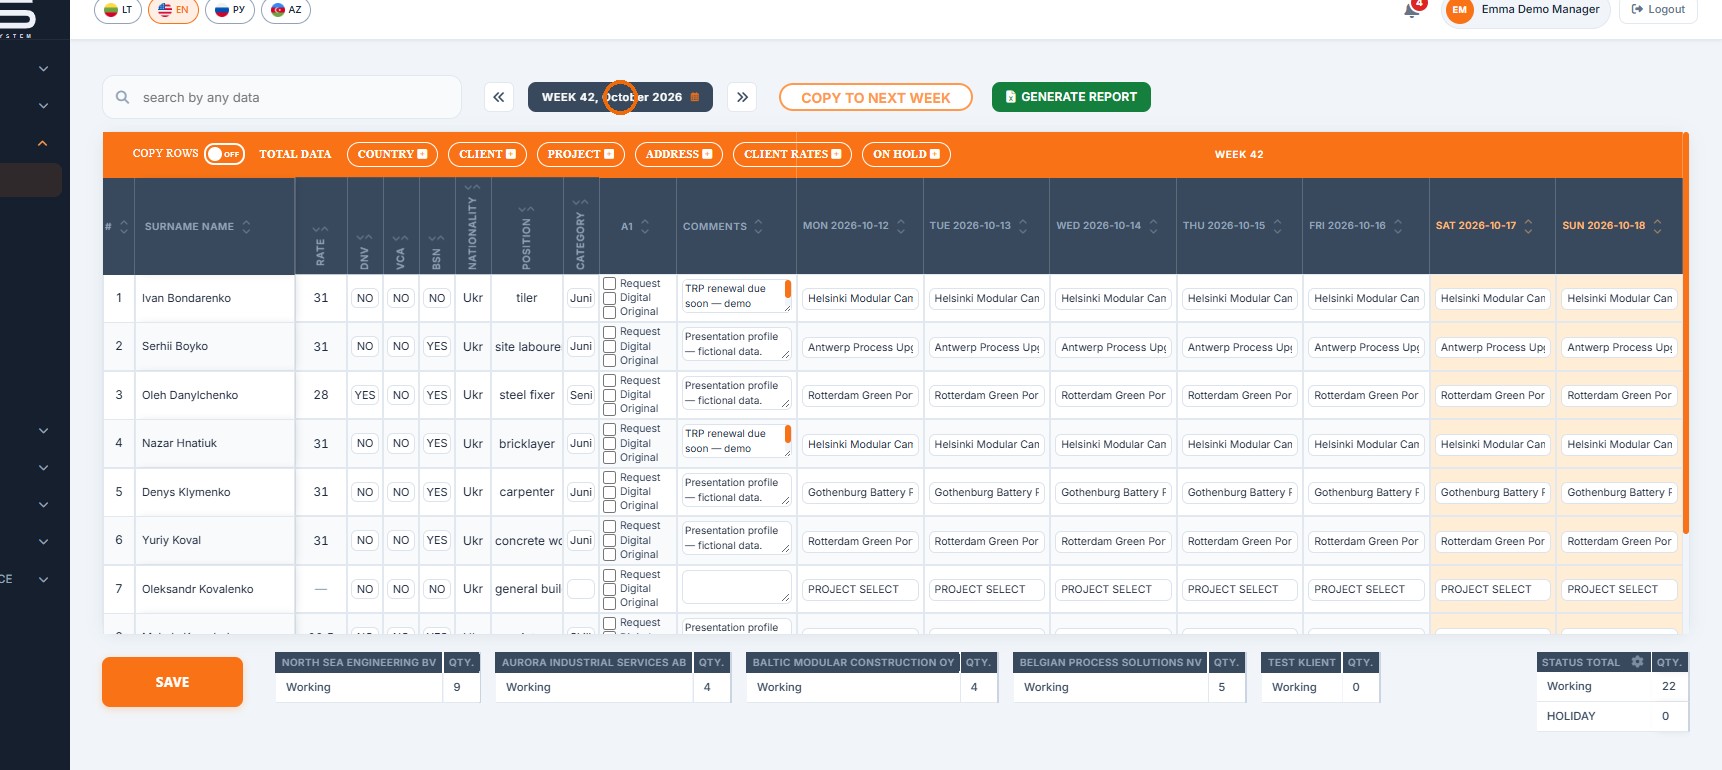
    The weekly plan: captured UMS screen
  2. Search any data

    Type in the search box above the table. The plan filters as you type and matches names, positions, projects and other visible values. The address bar keeps the search, so the filtered view can be reloaded. Clear the box with the × button to show all workers again.
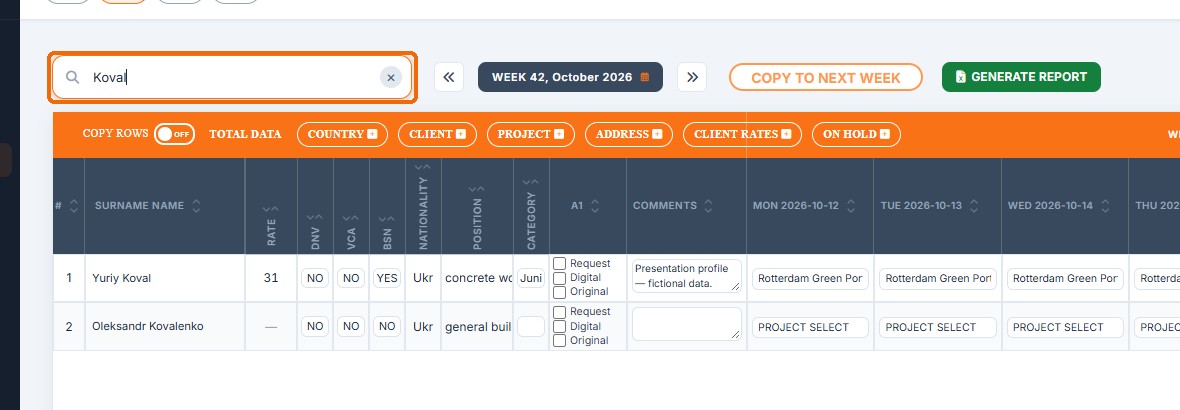
    Search any data: captured UMS screen
  3. Move between weeks

    The « and » arrows load the previous or next week. The dark label between them shows the week number and month that is currently displayed. Save your edits before changing the week, because unsaved changes on the page are not carried over.
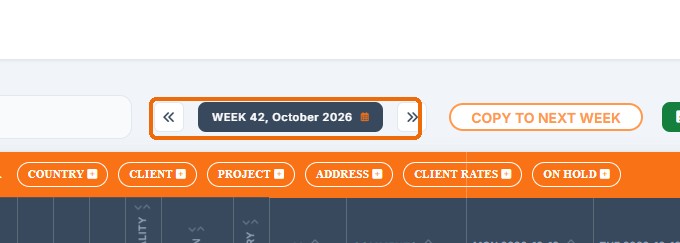
    Move between weeks: captured UMS screen
  4. Jump to any week

    Click the week label to open the calendar. Week numbers are shown on the left and the selected week is highlighted in orange. Use the arrows to change month, click any day of the week you need, then press OK. Today returns to the current date and Cancel closes the calendar without changes.
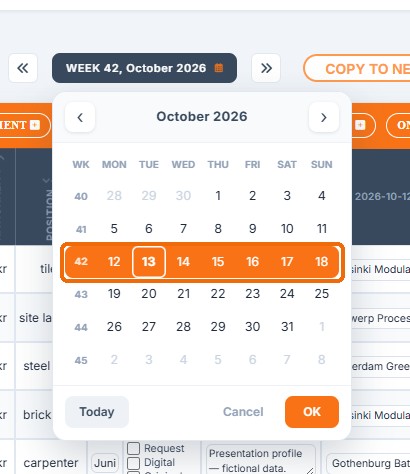
    Jump to any week: captured UMS screen
  5. Worker details

    RATE shows the worker's hourly rate. DNV, VCA and BSN are YES/NO switches for the corresponding certificates or registrations. NATIONALITY, POSITION and CATEGORY describe the worker. The A1 column has Request, Digital and Original check boxes to track the A1 certificate, and COMMENTS holds a short free-text note for planners.
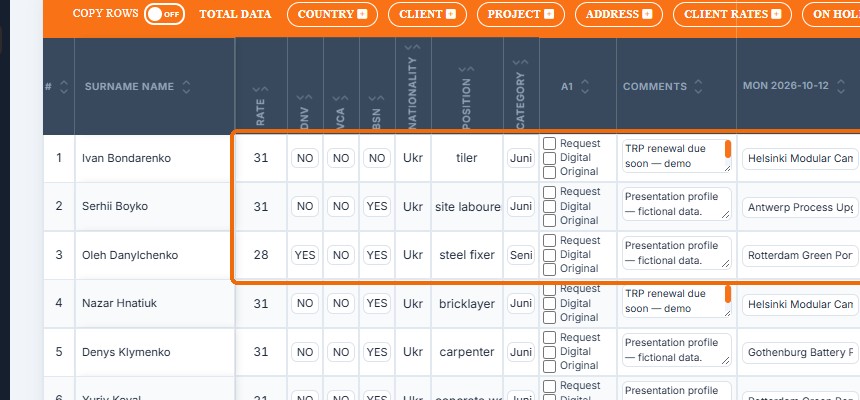
    Worker details: captured UMS screen
  6. Sort the columns

    Every column header has small up and down arrows. Click them to sort the table ascending or descending by that column, for example alphabetically by surname, by rate or by the project planned on a given day. The sort works together with search and pagination.

    Sort the columns: captured UMS screen
  7. Plan a working day

    Point at or click a day cell to expand it. The cell then shows a chain of selectors: country, client, project, address and shift. Each choice narrows the next list, so only projects of the chosen client and addresses of the chosen project are offered. An empty cell shows PROJECT SELECT. Press SAVE to store the plan.
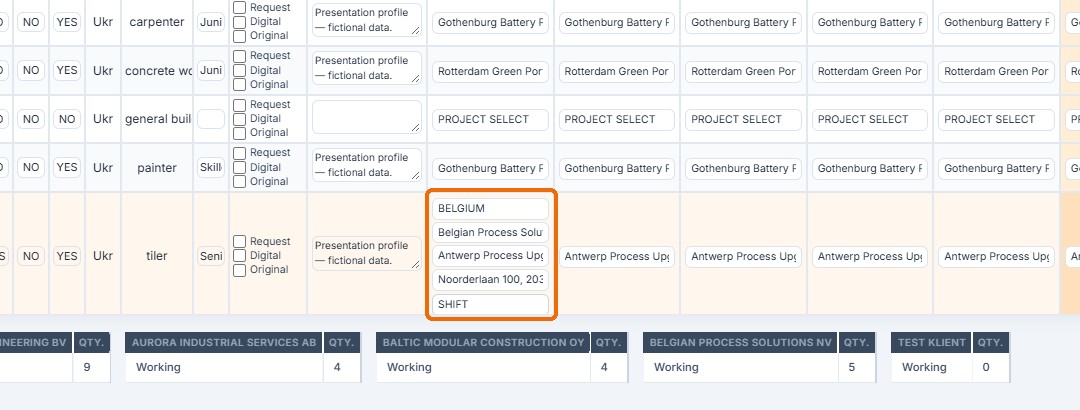
    Plan a working day: captured UMS screen
  8. Copy rows

    Switch COPY ROWS to ON to show two extra columns. Choose one worker in COPY FROM (round button) and tick one or more workers in COPY TO (square boxes). Clicking the COPY ROWS label then copies the source worker's week plan to all ticked workers. Switch it OFF to hide the copy columns again.
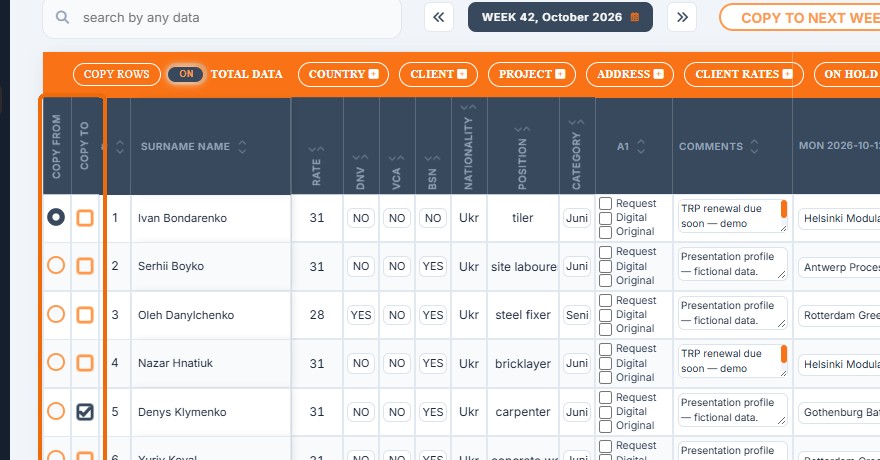
    Copy rows: captured UMS screen
  9. Copy to next week

    COPY TO NEXT WEEK copies the whole plan of the displayed week into the following week. Use it when most people continue on the same projects, then open the next week and adjust only the changes. Check the target week afterwards; this tutorial explains the button without running it on the demo data.
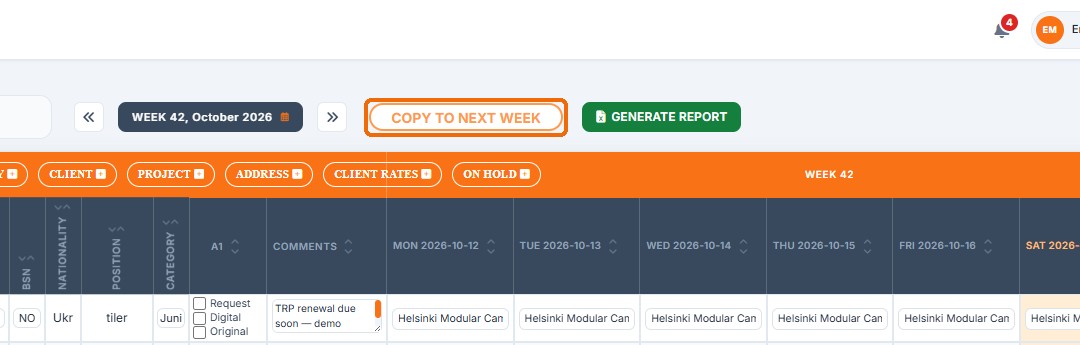
    Copy to next week: captured UMS screen
  10. Save your changes

    Changes in day cells, switches, A1 boxes and comments stay on the page until you press SAVE. Save before you change the week, open another page or reload, otherwise unsaved edits are lost. After saving, the totals below the table are recalculated.

    Save your changes: captured UMS screen
  11. Live totals

    Below the table, one small table per client shows how many people work for that client in the displayed week. STATUS TOTAL on the right sums all statuses for the whole organization, for example Working and HOLIDAY. The figures follow the saved plan.

    Live totals: captured UMS screen
  12. Choose shown statuses

    Click the gear icon in the STATUS TOTAL header. Tick the statuses that should appear in the STATUS TOTAL table for your organization and press SAVE. People are counted on the Friday of the displayed week. New ON HOLD options appear in this list automatically.

    Choose shown statuses: captured UMS screen
  13. Manage master data

    The TOTAL DATA buttons in the orange bar open editors for the lists used in planning: COUNTRY, CLIENT, PROJECT, ADDRESS, CLIENT RATES and ON HOLD. Changes made there become available in the day-cell selectors after saving.

    Manage master data: captured UMS screen
  14. Countries

    The COUNTRY editor lists the countries available for clients and projects. Type a name in the empty row and press + to add it; use - to remove a country that is no longer needed. Press SAVE to apply the changes.

    Countries: captured UMS screen
  15. Clients

    The Client editor lists all clients. Type a new client name in the last row and press + to add it, or use - to remove an unused client. Press SAVE to apply. Clients appear in the CLIENT selector of every day cell.

    Clients: captured UMS screen
  16. Projects

    The PROJECT editor groups projects under each client. Every project has a country. Type a new project name, choose its country and press + to add it, or - to remove the row. The box icon archives a finished project so it no longer appears in planning lists while history is kept.

    Projects: captured UMS screen
  17. Archived projects

    ARCHIVED PROJECTS at the bottom of the editor shows projects that were archived, so they can be reviewed or restored. Press SAVE to apply all project changes made in this window.

    Archived projects: captured UMS screen
  18. Project addresses

    The ADDRESS editor lists every project with its site addresses. A project can have several addresses. Type a new address and press + to add it; use the box icon to archive an old address. ARCHIVED ADDRESSES shows archived ones. Press SAVE to apply.

    Project addresses: captured UMS screen
  19. ON HOLD options

    ON HOLD options are statuses used instead of a project, such as HOLIDAY or HOLIDAY ARRIVAL. Each option has a colour used in the plan. Type a new option name and press +, pick its colour, or remove it with -. Press SAVE to apply.

    ON HOLD options: captured UMS screen
  20. Client rates

    CLIENT RATES lists each client with its current rate and the date it applies from. Use Search to find a client, tick Include archived clients to see archived ones, + Rate-only client to add a client that holds rates only and is never offered in planning, and Tariff-history report to export rate versions for a period.

    Client rates: captured UMS screen
  21. Tariff details

    Select a client to open its tariffs. Client default applies to all projects unless a project has its own rate; project chips show Inherited when they use the default. CURRENT lists weekday, Saturday, Sunday, overtime and night tariffs and hour thresholds; PREVIOUS shows the earlier version. Archive client hides a client from planning.
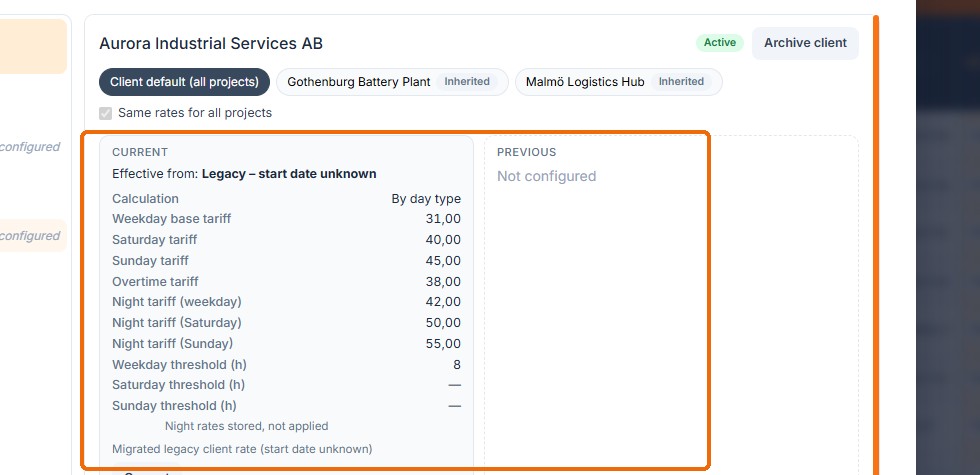
    Tariff details: captured UMS screen
  22. Generate a report

    GENERATE REPORT opens the planning report window. The report is exported as an Excel file built from the saved planning data.
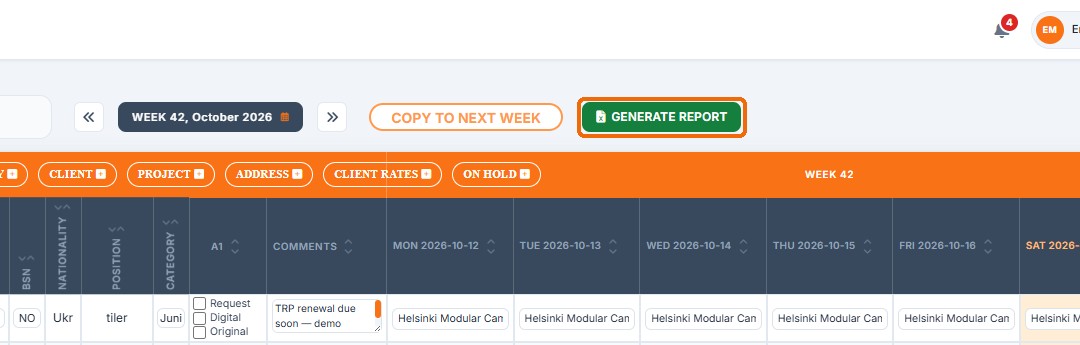
    Generate a report: captured UMS screen
  23. Report settings

    In WEEKS, click one or more week buttons to include them; use the arrows to show earlier or later weeks. The line below counts the selected weeks. Each selected week is written to its own sheet in the Excel file.

    Report settings: captured UMS screen
  24. Download the report

    KEY DAY decides on which day of each week workers are counted on their planned project (Friday by default). ON HOLD OPTIONS PER SECTION chooses which ON HOLD statuses are listed in the Waiting, Holiday and Holiday arrivals sections. Press DOWNLOAD to create the Excel file.
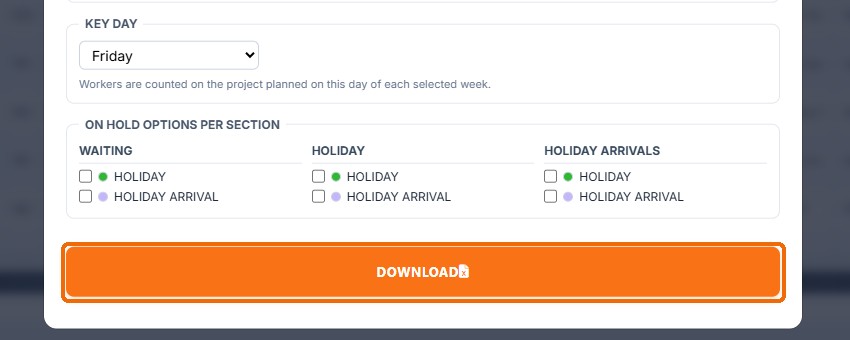
    Download the report: captured UMS screen
  25. Pages and rows

    The pager under the table shows which workers are displayed (for example 1–10 of 23). Use the arrows to move to the first, previous, next or last page. Rows sets how many workers appear per page and Page jumps directly to a page number.


    Pages and rows: captured UMS screen
Archive · 2 walkthroughs

Keep former workers and their test records in order.

Animated walkthroughs from the presentation tenant. An orange cursor shows exactly where to click, with short English captions and a screenshot PDF for every Archive page.

Complete Archive PDF guide ↗

Workers Archive

Move dismissed workers into the archive, find them later, restore them or remove them for good.

1080p

1920 × 1080 · English · Animated walkthrough with cursor highlights · No audio
Emma Demo Manager · Presentation tenant · Captured October 2026

Read the steps here
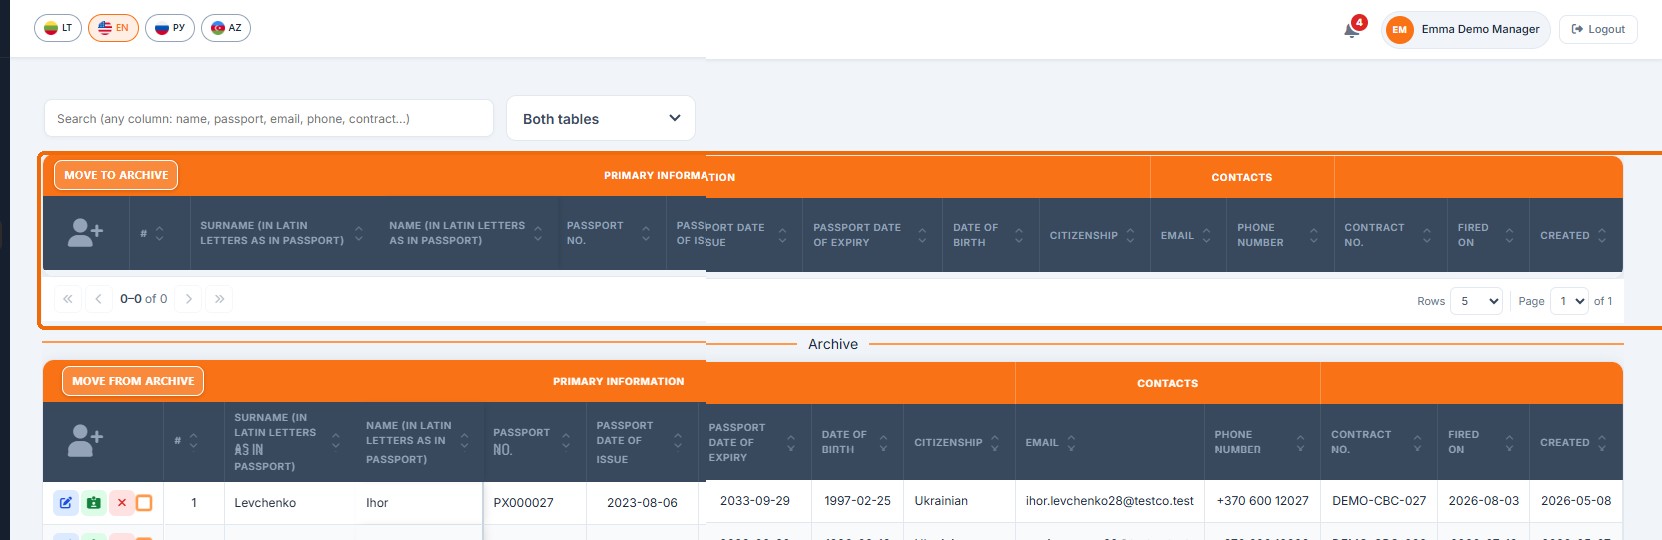
  1. Two tables on one page

    Open Archive > Workers Archive. The page has two tables with the same columns. The upper table lists workers who already have a Fired on date but are still in the active database. The lower table, under the Archive divider, lists workers that have been moved to the archive. Both tables show primary information, contacts, contract number, Fired on and Created dates.

    Two tables on one page: captured UMS screen
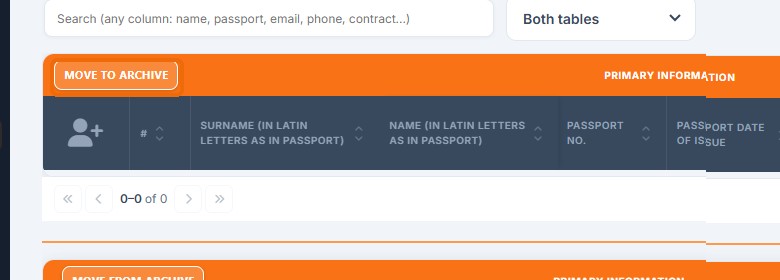
  2. Dismissed workers wait here

    Workers are not archived automatically. When a Fired on date is entered on a worker's card, the worker shows up in the upper table so the office can review the record first. In this example the upper table is empty (0 of 0), which means every dismissed worker has already been archived.

    Dismissed workers wait here: captured UMS screen
  3. Move to the archive

    Tick the checkbox at the start of each row you want to archive, then press MOVE TO ARCHIVE in the orange header. The selected workers are copied to the archive with their history, their employment is deactivated and they disappear from the active lists. Check the selection before pressing the button, because the move runs immediately.

    Move to the archive: captured UMS screen
  4. Search both tables

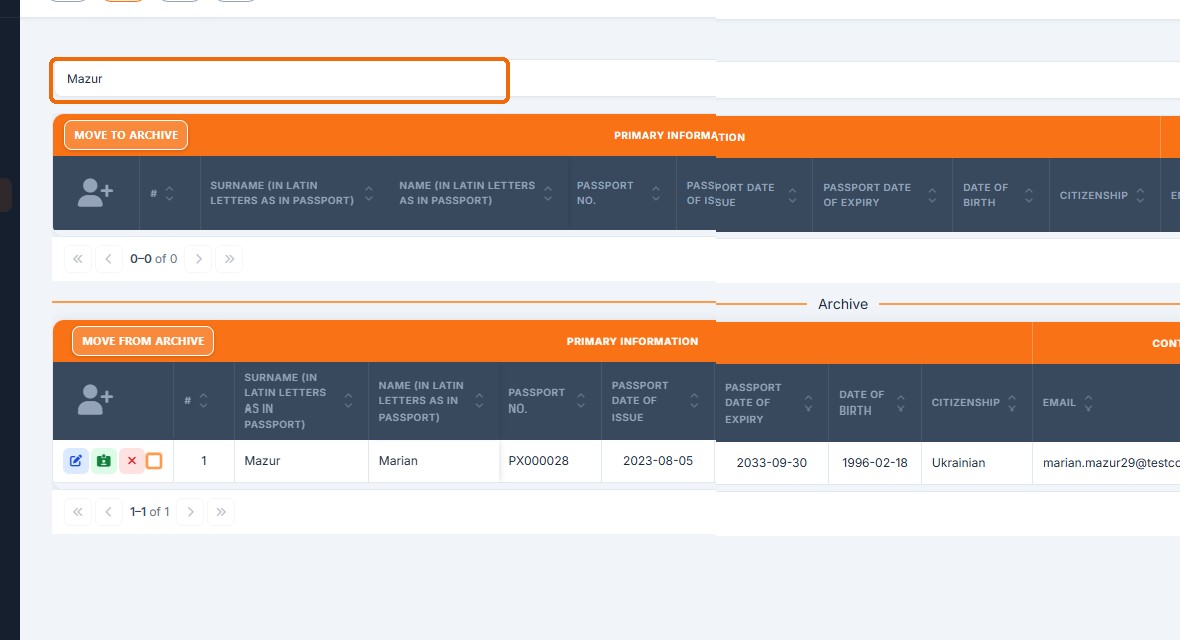
    The search box filters both tables at once and matches any column: surname, name, passport number, email, phone, contract number and more. Here, typing Mazur leaves one archived worker. The search is kept in the address bar, so the filtered view can be bookmarked or reloaded. Clear the box to show all records again.

    Search both tables: captured UMS screen
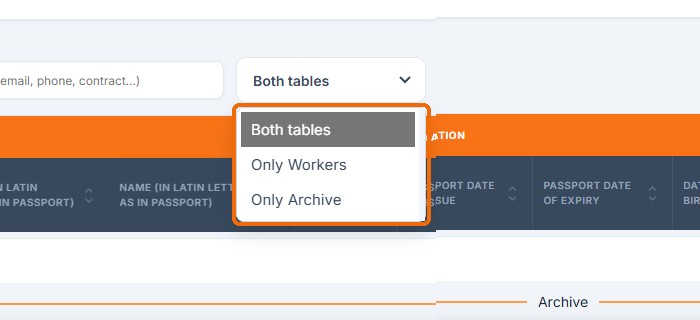
  5. Choose what to show

    The selector next to the search box switches the view. Both tables shows the full page. Only Workers shows the dismissed workers waiting to be archived, and Only Archive shows the archive alone. A single table shows 10 rows per page instead of 5, which is handy when you work through a long list.

    Choose what to show: captured UMS screen
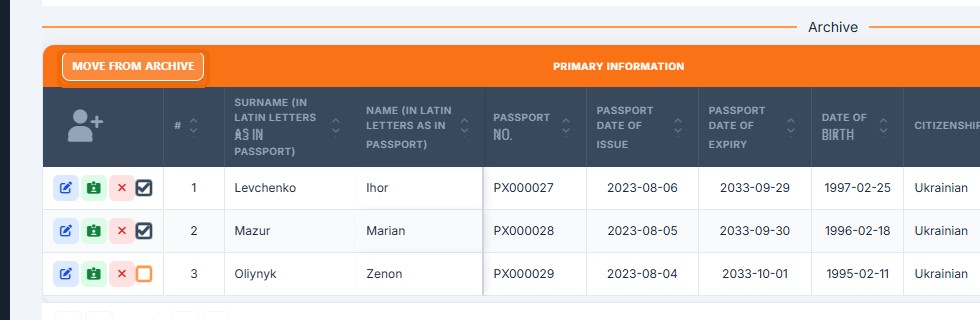
  6. Restore from the archive

    To bring a worker back, for example when they are hired again, tick their rows in the archive table. The checkbox turns dark when it is selected. Then press MOVE FROM ARCHIVE. The workers and their history are moved back to the active database and leave the archive. Untick a box to remove a row from the selection.

    Restore from the archive: captured UMS screen
  7. Open the worker card

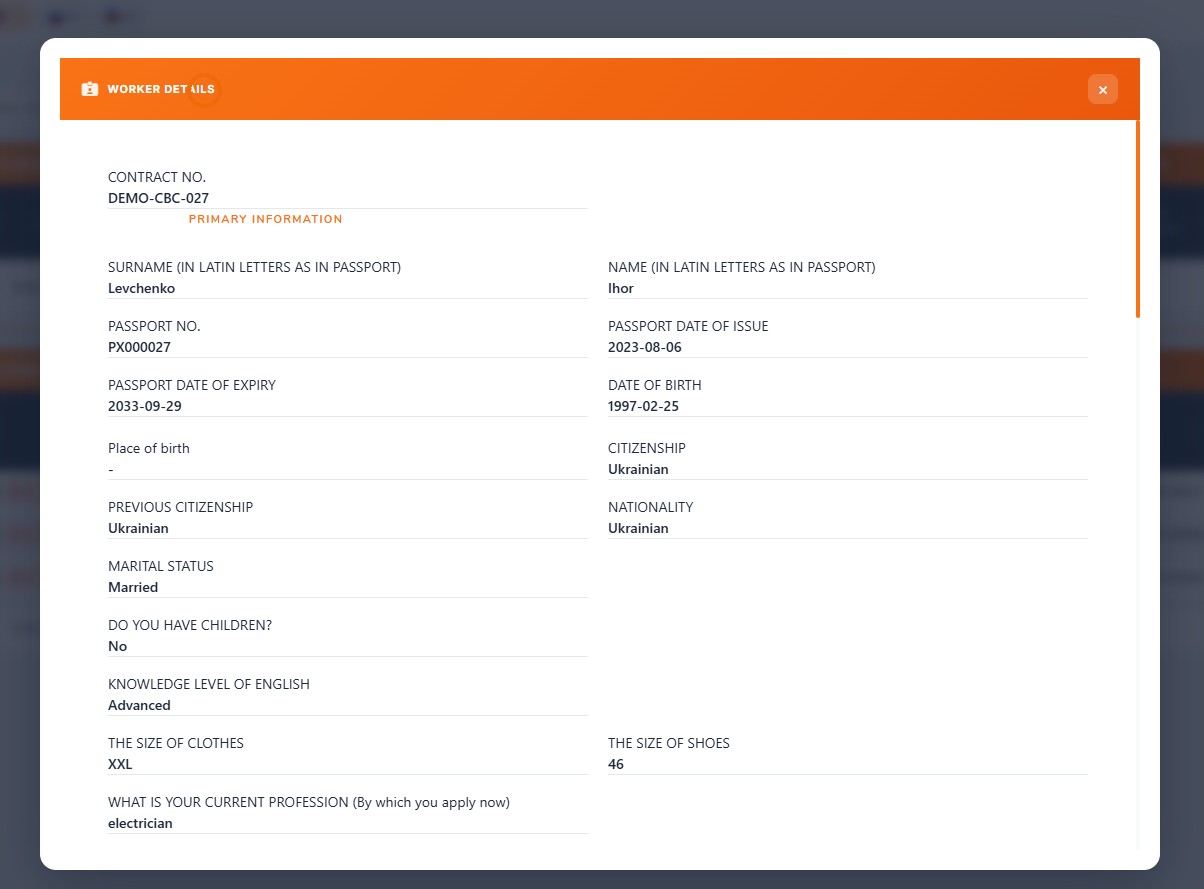
    Each row starts with three action buttons. The green card button opens Worker details, a read-only summary with the contract number, primary information, passport data, citizenship, family status, language level, clothing sizes and profession. Close it with the × button in the orange header.

    Open the worker card: captured UMS screen
  8. Correct archived data

    Use the blue edit button when an archived record needs a correction. The Edit worker form holds all stored fields, including Are you currently employed, Fired on, citizenship and passport data. Scroll to the bottom and press Submit to save, or close the form with × to discard your changes.

    Correct archived data: captured UMS screen
  9. Delete permanently

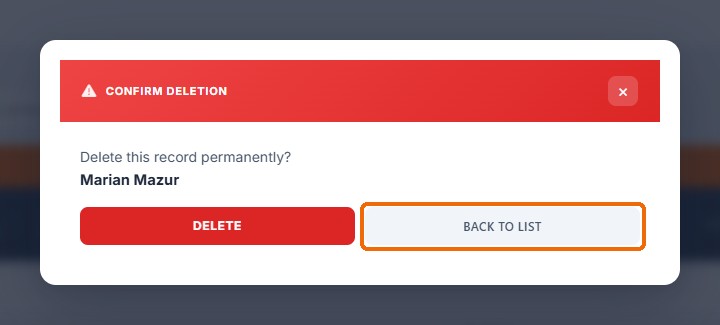
    The red × button opens Confirm deletion with the worker's name. DELETE removes the record permanently and it cannot be restored, so use it only for records that must not be kept. BACK TO LIST closes the dialog without changes. Warning: archiving is usually the safer choice, because an archived worker can be restored later.

    Delete permanently: captured UMS screen
  10. Sort and page through

    Click any column header with the small arrows to sort by that column; click again to reverse the order. Under each table, the arrows and the counter (for example 1-3 of 3) move between pages, Rows sets how many records are shown and Page jumps straight to a page number.
    Sort and page through: captured UMS screen
Safety · 9 walkthroughs

Keep safety documents, tests and PPE records in one place.

Animated walkthroughs from the presentation tenant. An orange cursor shows exactly where to click, with short English captions and a screenshot PDF for every Safety page.

Complete Safety PDF guide ↗

Safety Material & Professions

Upload safety documents, choose who must read and sign them, and keep the profession list up to date.

1080p

1920 × 1080 · English · Animated walkthrough with cursor highlights · No audio
Emma Demo Manager · Presentation tenant · Captured October 2026

Read the steps here
  1. One page for materials and professions

    Open Safety > Safety Material & Professions. At the top, the Existing Safety Materials table lists every safety document already uploaded, with its file name, upload date, description and the professions it is assigned to. Below it are the Add profession box and the Available professions list, and at the bottom of the page the Upload safety materials form.

    One page for materials and professions: captured UMS screen
  2. Available professions

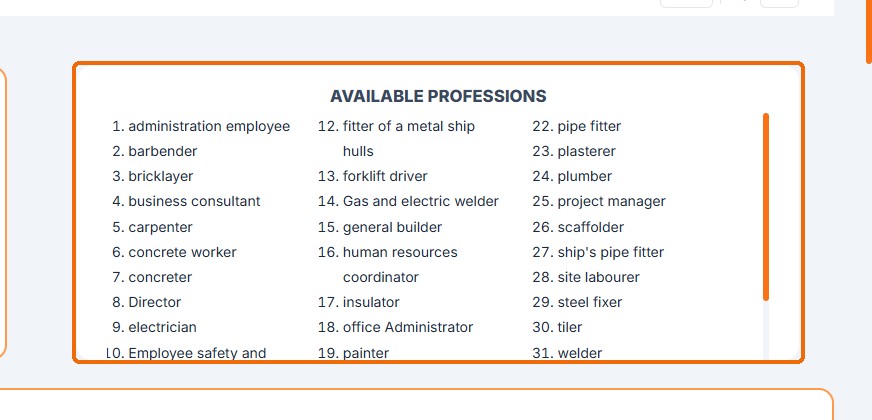
    The Available professions list shows every profession that can receive safety documents. When a document is assigned to a profession, everyone employed with that profession gets it, including people hired later. Scroll the list to see all professions and check that the one you need exists before you upload a new material.

    Available professions: captured UMS screen
  3. Add a missing profession

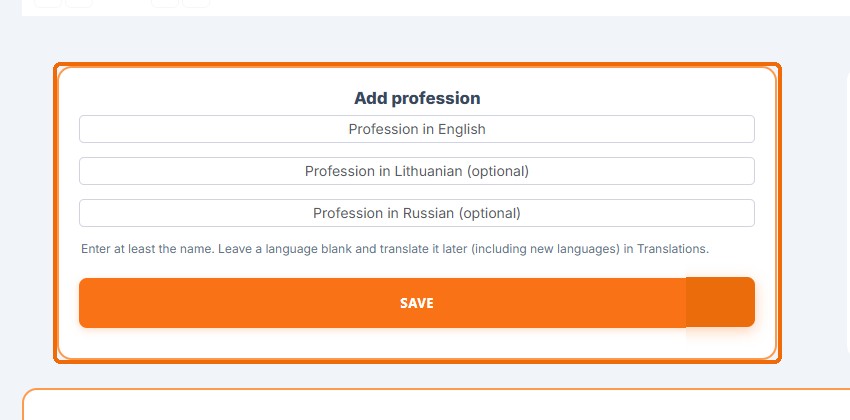
    If a profession is missing, enter it in the Add profession box. The English name is enough. The Lithuanian and Russian fields are optional, and any language, including languages added later, can be translated afterwards in the Translations menu. Press SAVE and the new profession appears in the Available professions list and in every profession dropdown.

    Add a missing profession: captured UMS screen
  4. Upload a document

    Scroll down to Upload safety materials. Drag the file into the dashed area or click it to choose the file from your computer. PDF, DOC, PNG and JPG files are accepted. Safety instructions, director orders and rules are typical documents uploaded here.

    Upload a document: captured UMS screen
  5. File description

    The File description is the title workers see in their E-Safety list and the name used in Tests Reports. Write it in one language. The other languages, including new ones, can be added later in the Translations menu, so you do not need to upload the same document again for each language.

    File description: captured UMS screen
  6. Document options

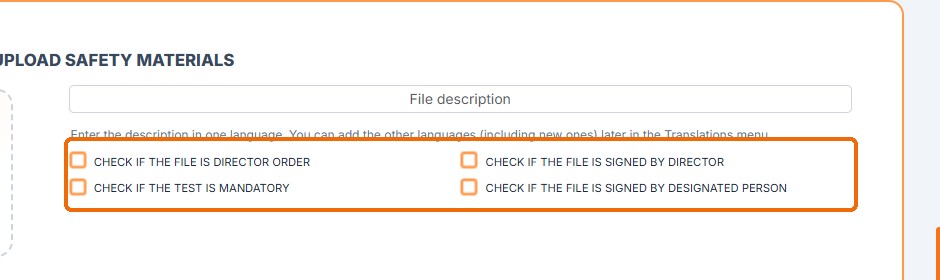
    Director order: the file is an order issued by the director and employees confirm they have read it. Test is mandatory: the worker must also pass the test linked to this material (create it in Create Tests). No upload email is sent; workers are asked when the test is ready. Signed by director: the director signs first and employees see the document only after that. Signed by designated person: a responsible person, for example the safety specialist, also signs it.

    Document options: captured UMS screen
  7. Assign to individual users

    Under Select users, pick a person by name to assign the document to them individually. Press ADD USER to add more rows, or remove a row with the red x. This is meant for exceptions, for example a single person who must read a specific instruction or someone whose profession is not in the list.

    Assign to individual users: captured UMS screen
  8. Assign by profession

    Under Select professions, pick one or more professions, or tick SELECT ALL PROFESSIONS to assign the document to everyone. Users and professions are combined: a person receives the document if their profession is selected or if they are selected by name. Assign by profession as the normal way and use individual users only for exceptions.

    Assign by profession: captured UMS screen
  9. Upload and notify

    Press UPLOAD to save the material with its options and assignments. Everyone it is assigned to receives an email and a notification in the bell, and the document appears in their E-Safety (to sign) list. If Test is mandatory is ticked, the email is sent when the test is ready instead.

    Upload and notify: captured UMS screen
  10. Search the materials

    Every uploaded document is listed in Existing Safety Materials. The search box above the table filters by any value: file name, upload date, description or assigned profession. The table can also be sorted by clicking the column headers, and the pager below it changes the page and the number of rows.

    Search the materials: captured UMS screen
  11. Edit assignments or delete

    Each row has two actions. The blue person icon opens Edit assignments, where you change the professions, users and options of the document without uploading it again. The red x deletes the material. Deleting removes the document from everyone's list, so use it only for files that are no longer valid.

    Edit assignments or delete: captured UMS screen
  12. Change who must sign

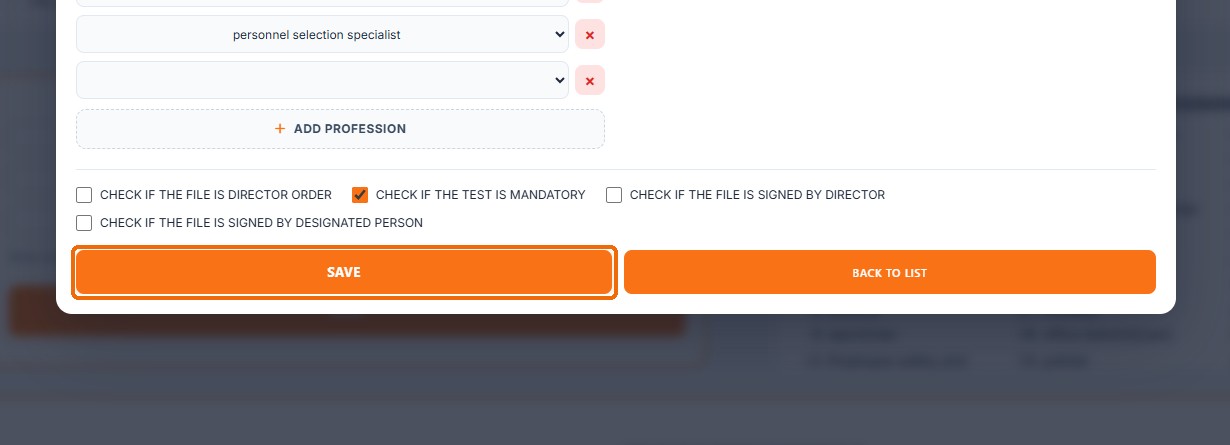
    Edit assignments opens with the document name at the top. The left column lists the assigned professions and the right column the individually assigned users. Change a dropdown to swap a profession or user, press ADD PROFESSION or ADD USER to add rows, and use the red x to remove a row.

    Change who must sign: captured UMS screen
  13. Save the changes

    The same four options as in the upload form are shown below the lists, so you can for example make the test mandatory later. Press SAVE to store the new assignments; newly assigned people receive the document in their E-Safety list. BACK TO LIST closes the window without saving.

    Save the changes: captured UMS screen
Tenant Admin · 14 walkthroughs

Monitor obligations, employee lifecycle and GDPR requests in one place.

Animated walkthroughs from the presentation tenant. An orange cursor shows exactly where to click, with short English captions and a screenshot PDF for every Tenant Admin page.

Tenant Access (Roles & Access)

Decide which roles in your organization can open which pages, and manage the list of roles.

1080p

1920 × 1080 · English · Animated walkthrough with cursor highlights · No audio
Emma Demo Manager · Presentation tenant · Captured October 2026

Read the steps here
  1. Open Tenant Access

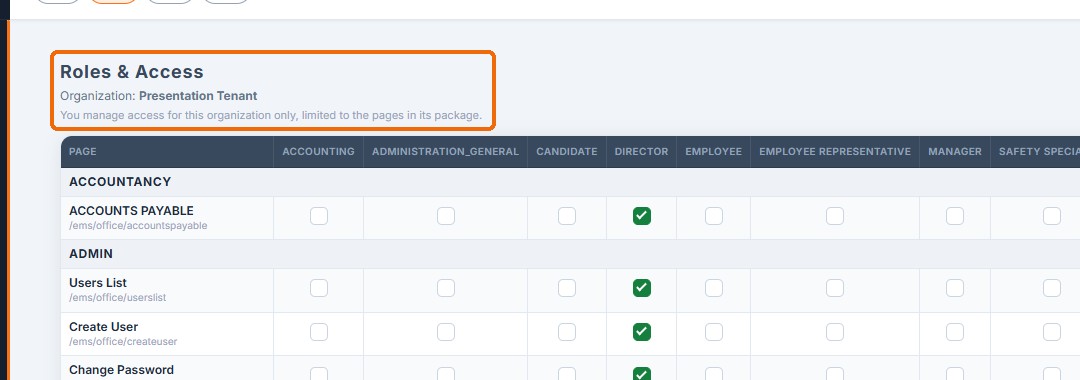
    Open Tenant Admin > Tenant Access in the side menu. The page is called Roles & Access. It controls which roles can open which pages in the current organization (tenant). A person sees a page in the side menu only when one of their roles in this organization is ticked for that page.

    Open Tenant Access: captured UMS screen
  2. Your organization only

    The line under the title names the organization you are editing (here Presentation Tenant). You manage access for this organization only: other organizations keep their own settings. Pages that are not part of the organization's subscription package are not listed at all, so you cannot grant access to a module the organization has not bought.

    Your organization only: captured UMS screen
  3. Roles are the columns

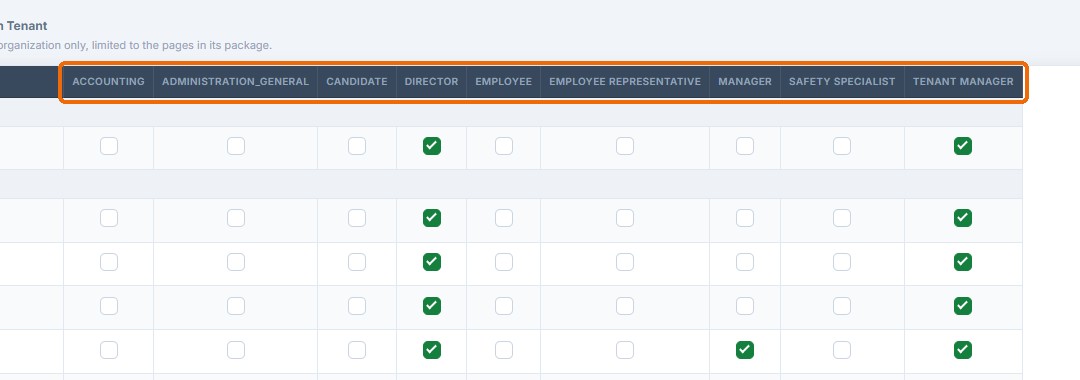
    Every column after PAGE is one role, for example Accounting, Administration_General, Candidate, Director, Employee, Employee representative, Manager, Safety specialist and Tenant Manager. Read a column from top to bottom to see everything that role can open. The GLOBAL ADMIN role is reserved for the platform administrator and is not shown.

    Roles are the columns: captured UMS screen
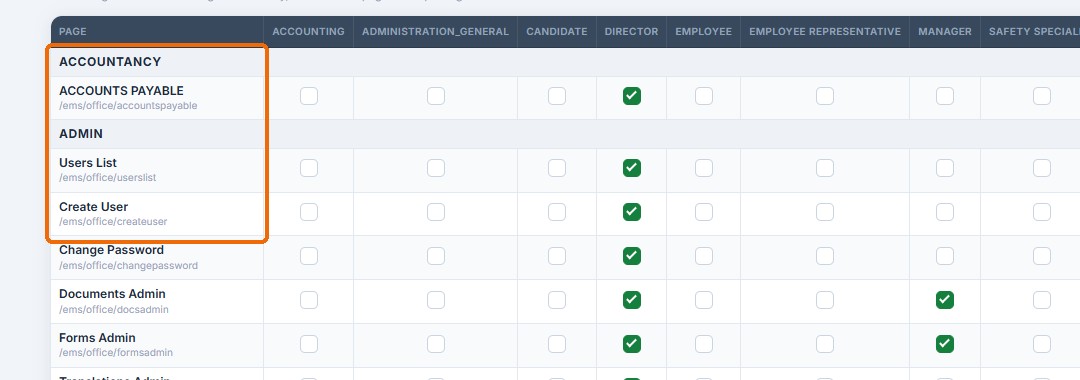
  4. Pages are the rows

    Every row is one page. Rows are grouped under the side-menu section they belong to (ACCOUNTANCY, ADMIN and so on). The grey text under each page name is its address, for example /ems/office/accountspayable, which helps when two pages have similar names.

    Pages are the rows: captured UMS screen
  5. Grant or revoke access

    A green tick means the role has access to the page; an empty box means it does not. Clicking a box grants or revokes access immediately: there is no separate Save button, and the side menu of the affected people updates on their next page load. Because changes are instant, check the row and column before you click.

    Grant or revoke access: captured UMS screen
  6. The Tenant Manager column

    The Tenant Manager column is ticked on almost every page, including the admin pages such as Users List, Create User and Change Password. Untick a page here only if your managers really should not use it. Tenant Access, Organization Members, Branding and Act As User are not listed in the matrix at all, so the Tenant Manager can never remove their own access to this page.

    The Tenant Manager column: captured UMS screen
  7. Manage roles

    Click Manage roles in the top-right corner to see, add, rename or delete roles. The list shows the shared built-in roles plus the custom roles of YOUR organization only. Roles are assigned to people on the Organization Members page; this page only decides what each role can open.

    Manage roles: captured UMS screen
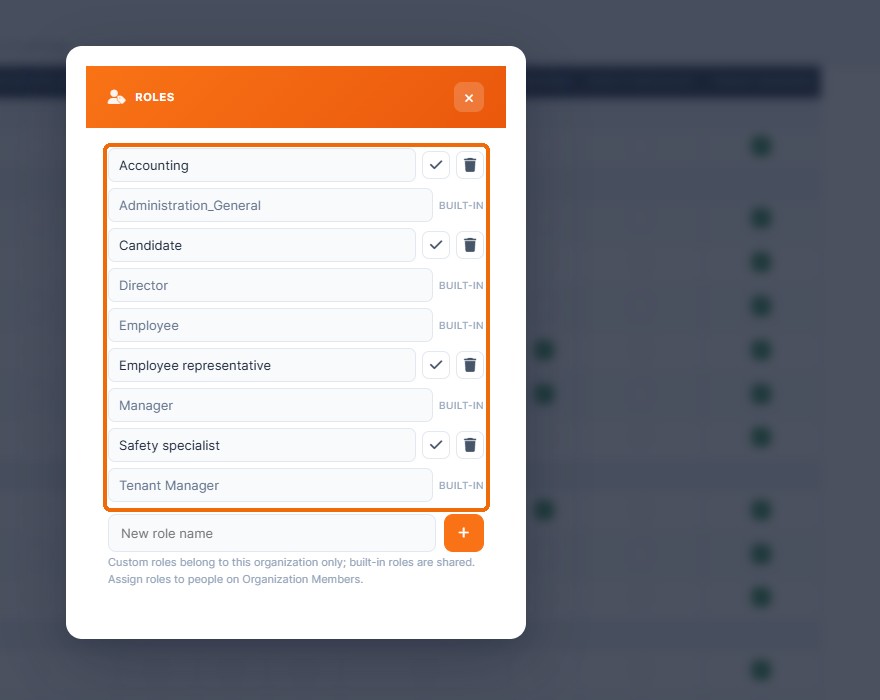
  8. The roles list

    The Roles window lists every role your organization can use. Roles marked BUILT-IN (Administration_General, Director, Employee, Manager, Tenant Manager) are shared by all organizations and used by the app itself, so only the platform administrator can rename or delete them. Custom roles such as Accounting or Candidate belong to your organization: the tick button renames and the bin button deletes them. Renaming keeps the role's page access and its people.

    The roles list: captured UMS screen
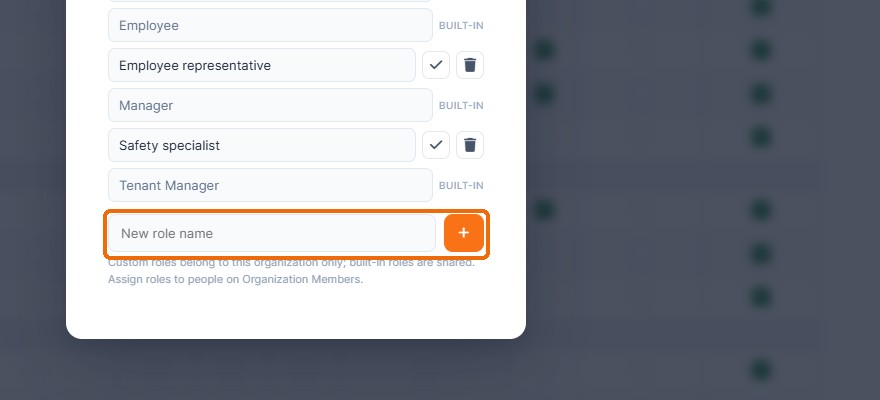
  9. Add a new role

    Type a name in New role name and press the orange + button to create a custom role; it appears as a new column in the matrix with no access. Custom roles belong to your organization only: adding, renaming or deleting one never changes another organization. Deleting a role (after a confirmation) removes its page access and takes it away from the people in your organization who had it.

    Add a new role: captured UMS screen
Platform & Compliance · 4 walkthroughs

Monitor obligations, employee lifecycle and GDPR requests in one place.

Animated walkthroughs from the presentation tenant. An orange cursor shows exactly where to click, with short English captions and a screenshot PDF for every Platform & Compliance page.

Complete Platform & Compliance PDF guide ↗

Organization Compliance

See your organization's compliance score, how many obligations are tracked, due soon or expired, and which follow-ups are still open.

1080p

1920 × 1080 · English · Animated walkthrough with cursor highlights · No audio
Emma Demo Manager · Presentation tenant · Captured October 2026

Read the steps here
  1. Open Organization Compliance

    Open Platform & Compliance > Organization Compliance in the side menu. The page is read-only: it summarises the compliance obligations tracked for the current organization (tenant) and lists the follow-up actions that are still open. Data from other organizations is never shown. Use it as the starting point for a weekly compliance check.

    Open Organization Compliance: captured UMS screen
  2. Compliance score

    The Compliance card is the overall score. It is the number of tracked obligations that are Valid, Completed or Waived divided by all tracked obligations, as a percentage. In the demo, 6 of 12 obligations are in order, so the score is 50%. When nothing is tracked yet, the score shows 100%.

    Compliance score: captured UMS screen
  3. Tracked obligations

    Tracked obligations is the total number of compliance records for the organization: residence permits, safety induction refreshers, occupational health certificates and similar items. Each one belongs to an employee and may have an expiry date. The full list is on the Compliance Obligations & Actions page.

    Tracked obligations: captured UMS screen
  4. Due soon and expired

    Due soon is the number of obligations that expire within their warning period, so there is still time to renew them. Expired is the number of obligations whose expiry date has already passed. Both kinds lower the compliance score and create a follow-up in the Action required list below.

    Due soon and expired: captured UMS screen
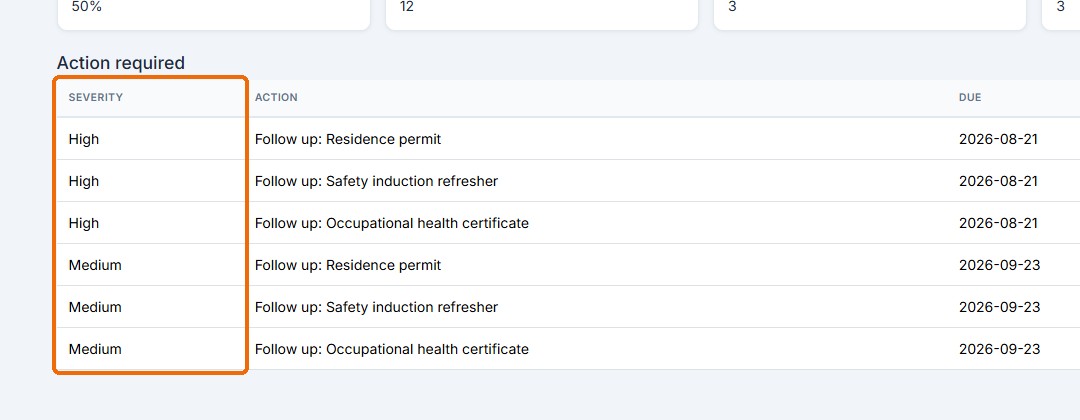
  5. Action required

    Action required is the queue of open follow-ups for the organization. SEVERITY shows how urgent each item is: expired obligations get the highest severity, items that are only due soon a lower one. The list is sorted with the most critical items first and then by due date, and shows up to 100 open items.

    Action required: captured UMS screen
  6. What has to be done

    ACTION describes what needs to happen, for example Follow up: Residence permit or Follow up: Occupational health certificate. The text comes from the obligation that triggered the action, so each line can be traced back to a specific record on the Compliance Obligations & Actions page.

    What has to be done: captured UMS screen
  7. Due date and status

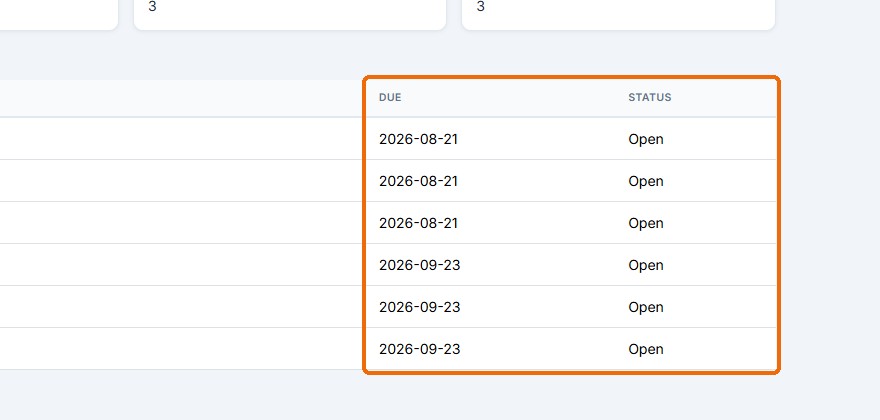
    DUE is the expiry date of the underlying obligation (shown as - when there is none). STATUS is Open for every item listed here; once an item is resolved, or the obligation becomes valid again after an expiry check, it disappears from this list. When nothing is open, the page shows No open compliance actions.

    Due date and status: captured UMS screen
  8. Where to act

    This dashboard is for monitoring only. To see which employee each action belongs to, to resolve actions and to review every tracked obligation, open Platform & Compliance > Compliance Obligations & Actions. That page is explained in the next lesson.

    Where to act: captured UMS screen
My Workspace · 4 walkthroughs

Your own password, protective equipment, safety documents and leave requests.

Animated walkthroughs from the presentation tenant. An orange cursor shows exactly where to click, with short English captions and a screenshot PDF for every page a worker uses for themselves.

Complete My Workspace PDF guide ↗

Change My Password

Change your own login password safely, with a live checklist of the password rules.

1080p

1920 × 1080 · English · Animated walkthrough with cursor highlights · No audio
Presentation tenant · Captured October 2026

Read the steps here
  1. Open Change Password

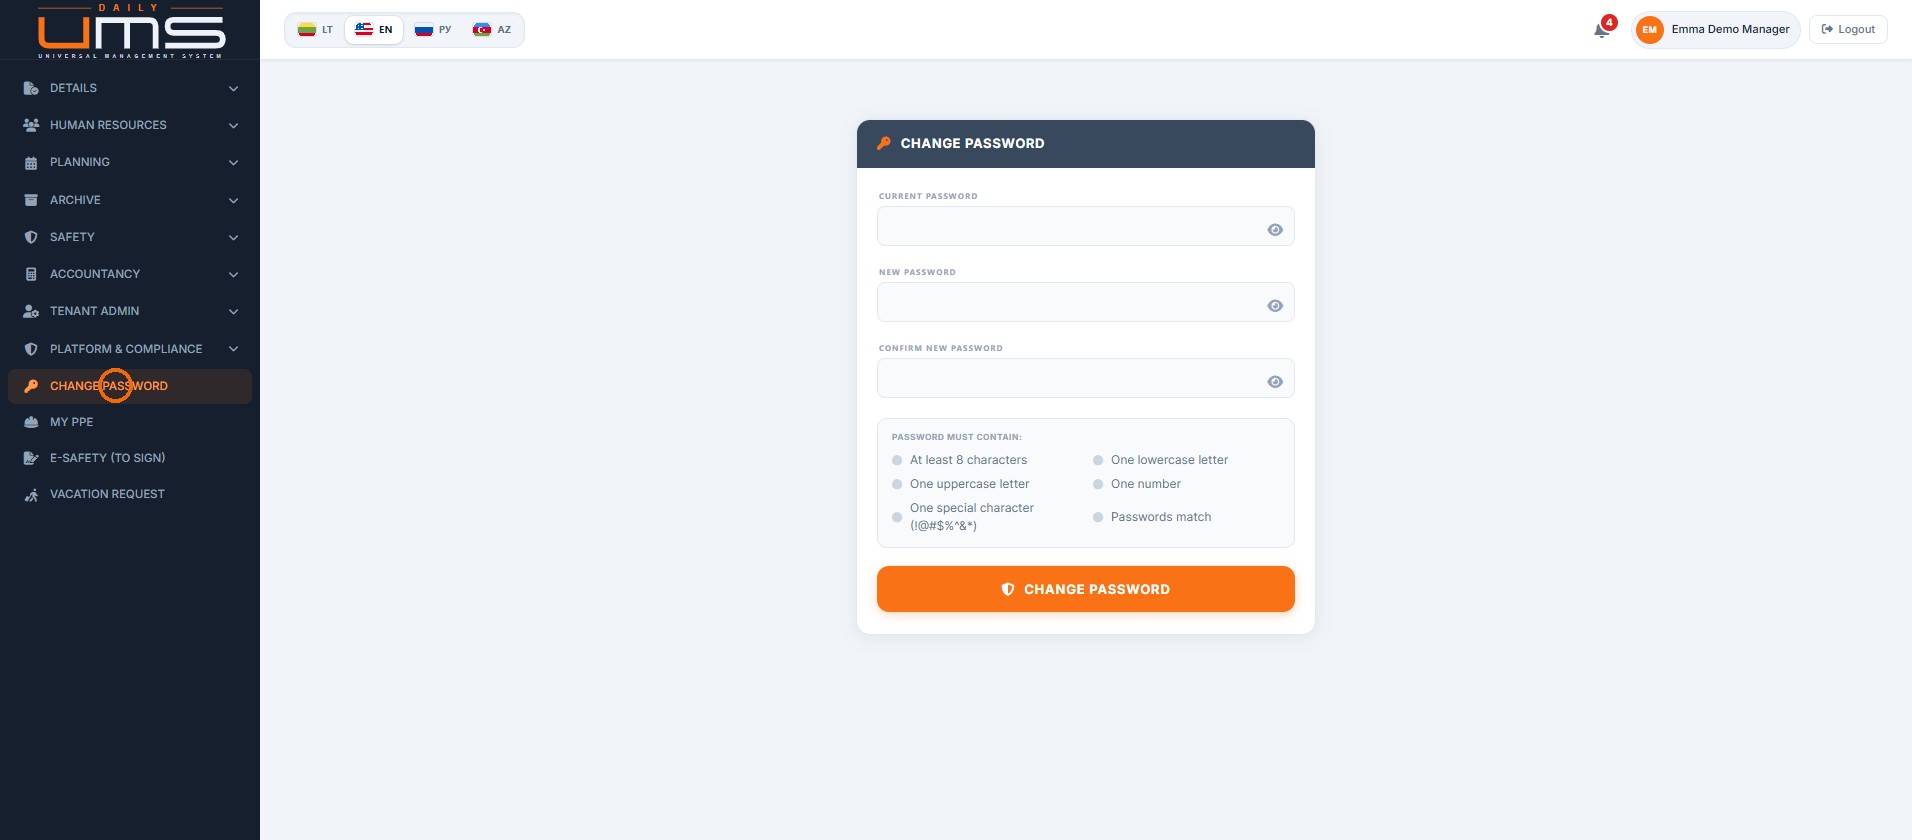
    Open CHANGE PASSWORD in the side menu. It sits in the personal part of the menu, next to My PPE, E-Safety (to sign) and Vacation request. Every signed-in user can open it, whatever their role. The page changes only your own password. Nothing is saved until you press the orange button at the bottom.

    Open Change Password: captured UMS screen
  2. Enter your current password

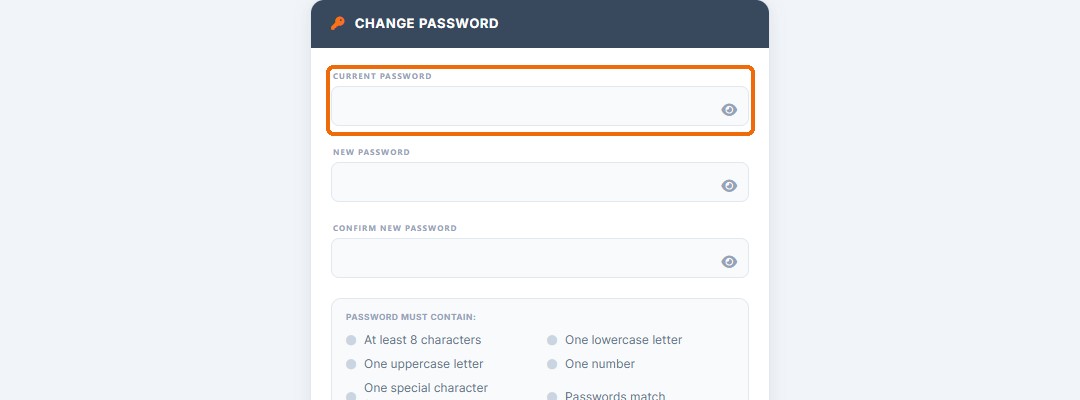
    Type the password you use today in CURRENT PASSWORD. The system checks it when you save: if it is wrong, the password is not changed and an error is shown above the fields. If you have forgotten your current password, you cannot use this page; ask your administrator to reset it. The administrator's reset emails you a new password.

    Enter your current password: captured UMS screen
  3. Type a new password

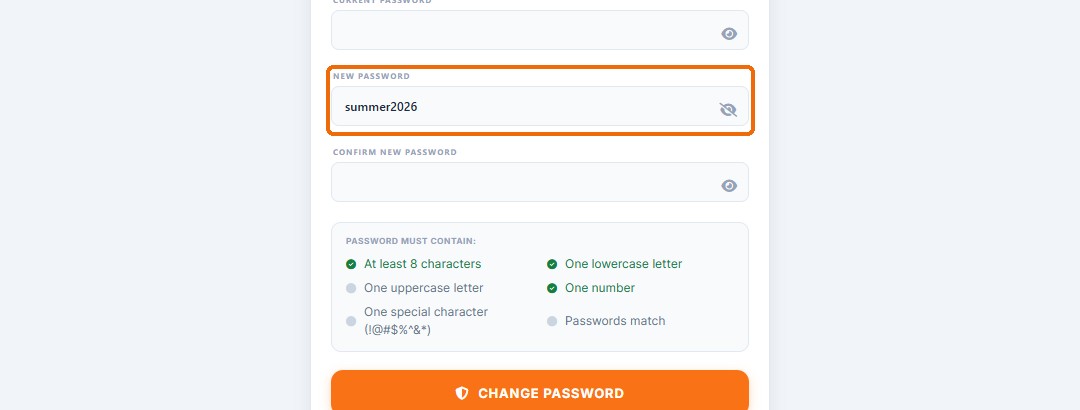
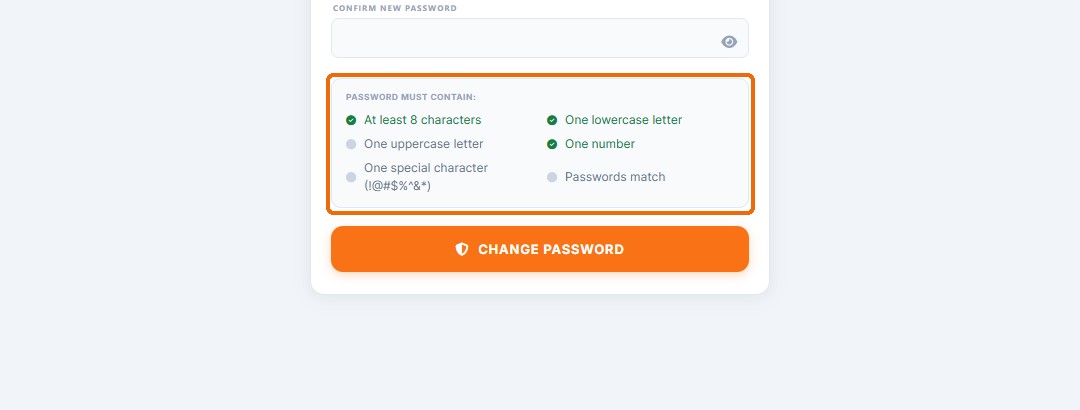
    Type your new password in NEW PASSWORD. The checklist under the fields updates with every key you press, so you see at once what is still missing. In this example the password summer2026 is long enough and has lowercase letters and numbers, but it has no uppercase letter and no special character yet.

    Type a new password: captured UMS screen
  4. Meet every rule

    The new password must contain at least 8 characters, one lowercase letter, one uppercase letter, one number and one special character from this set: ! @ # $ % ^ & *. The last rule, Passwords match, turns green when the confirmation is the same as the new password. The same rules are checked again on the server when you save, so a weak password is never accepted.

    Meet every rule: captured UMS screen
  5. Show or hide what you typed

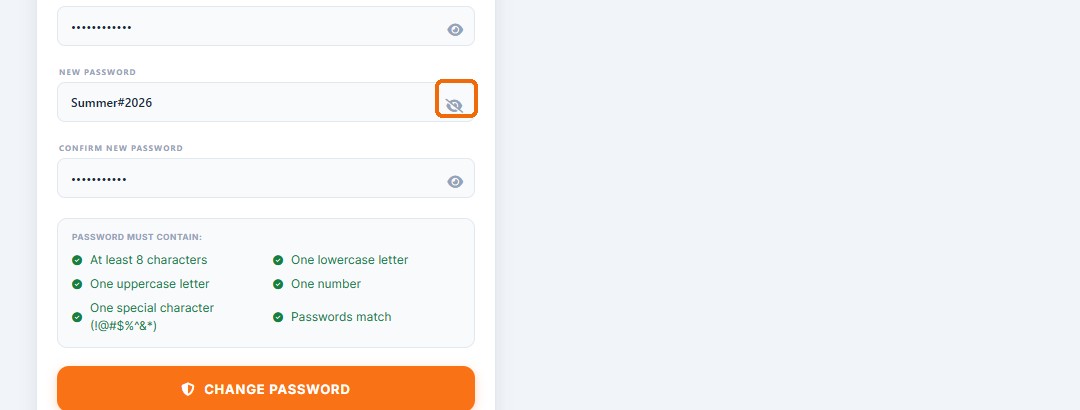
    Each field has an eye icon on the right. Click it to show what you typed as plain text, and click it again to hide it. Here the new password Summer#2026 is shown, so it can be checked for typos. Make sure nobody is looking at your screen while a password is visible.

    Show or hide what you typed: captured UMS screen
  6. Confirm the new password

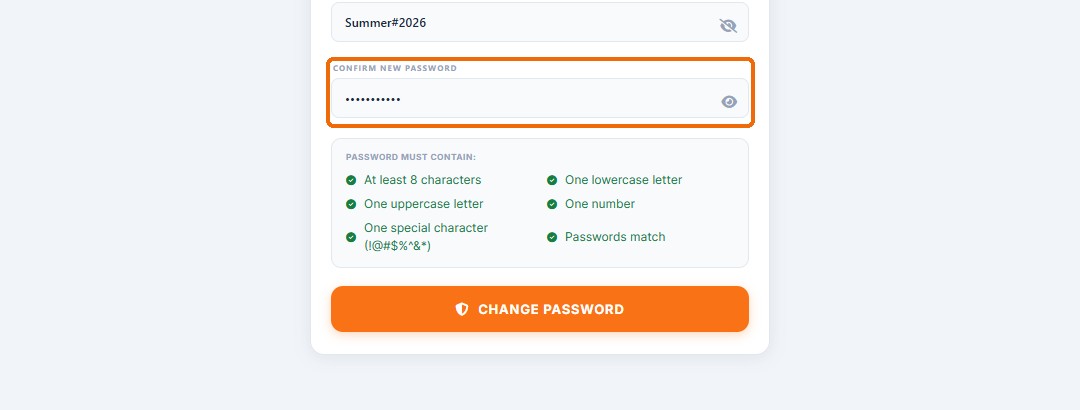
    Type the same new password again in CONFIRM NEW PASSWORD. This protects you from a typing mistake you would only notice at your next login. When both fields are the same, Passwords match turns green. Now every rule in the checklist is green.

    Confirm the new password: captured UMS screen
  7. Save the new password

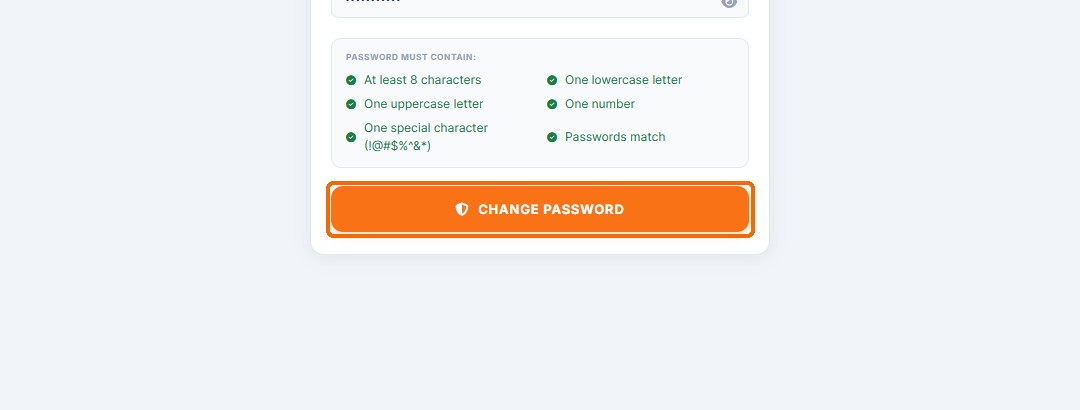
    Press CHANGE PASSWORD. The system checks your current password and the rules. If something is wrong, a red message explains it and nothing is changed. On success a green message says: Your password has been changed successfully. The fields are cleared, you stay signed in on this device, and from now on you log in with the new password.

    Save the new password: captured UMS screen

Clear responsibilities.
Controlled access.

A shared platform doesn’t mean everyone sees everything. Match access to the organisation and the role.

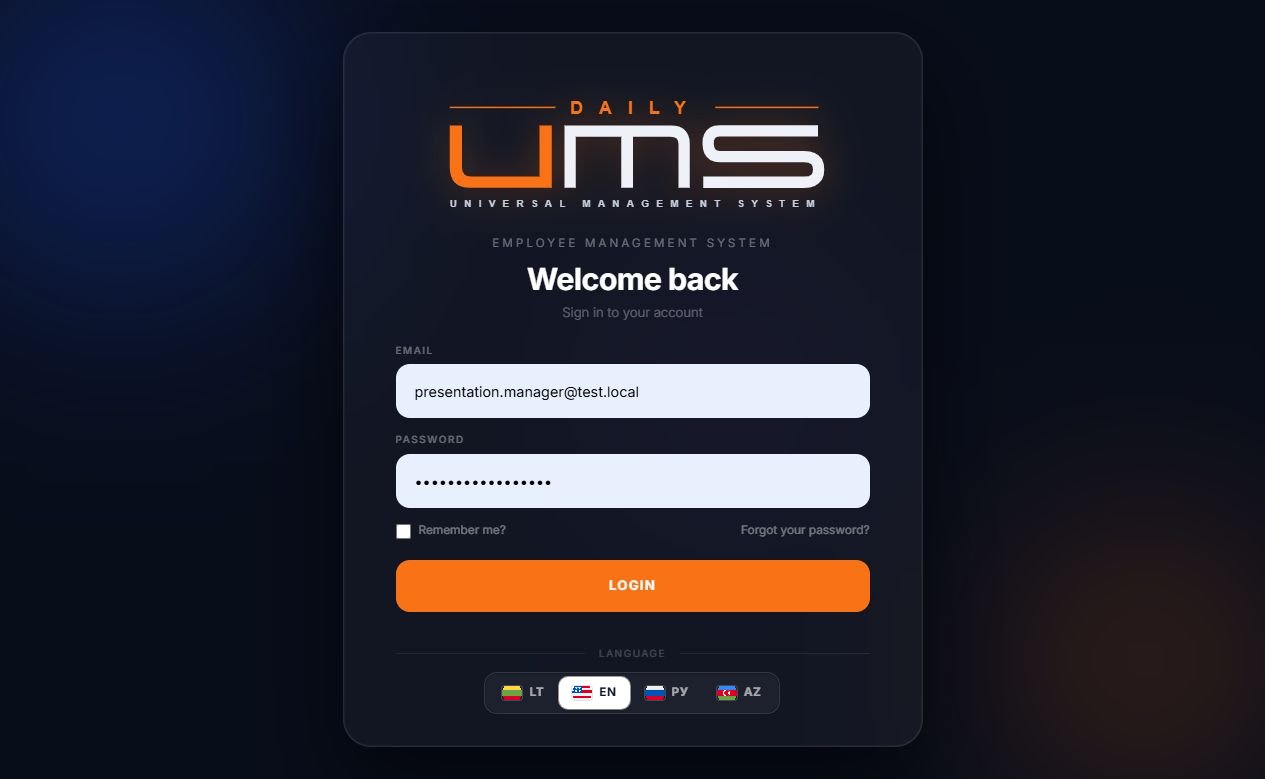
The Daily UMS signed-out login screen

Your team’s starting point. One familiar workspace.

Your organisation’s workspace

Keep membership, branding and settings in the context of your organisation.

Access that follows the role

Give managers, safety teams and employees the pages and tools their responsibilities require.

Evidence you can come back to

Keep signature evidence, compliance actions and data-governance workflows within reach.

Built-in guidance

Page-by-page tours help teams find their way through everyday workflows.

Hosted in the EU
GDPR-compliant by design
Encrypted data, regular backups
Your data stays yours — export anytime
Simple plans. Serious capability.

Start focused.
Add power as you grow.

Choose the workspace that fits your operation today. Every plan includes tenant administration, archive access and guided onboarding.

14-day free trialCard required · no charge for 14 days · cancel before your trial ends to avoid a charge
StarterUp to 40 employees

For small teams replacing scattered HR files and repetitive document work.

€890
per yearNo VAT charged
  • Human Resources module
  • Employee and candidate records
  • 5 templates · 200 documents/month
  • Up to 5 users
Choose Starter
EnterpriseUp to 500 employees

For organisations connecting operations, safety, compliance and oversight.

€7,490
per yearNo VAT charged
  • HR, Planning & Logistics
  • Safety & Testing · PPE records
  • Compliance, Accountancy & Communications
  • 150 projects · unlimited templates
  • 15,000 documents/month · 75 users
Choose Enterprise
Try before you choose

Request a free sandbox

Explore Daily UMS in your own presentation workspace with sample data — before ordering any plan. Take 14 days to try everything — no commitment.

  • Presentation workspace with sample data
  • Every module ready to explore
  • 14 days · no commitment
Request a sandbox
Custom development

Your process, built in.

Custom requirements are negotiable. Need a module, document template or integration that is not on the list? We design and code it for you — scope and price agreed upfront.

Talk to us

Annual plans include two months free. Setup and configuration assistance available — Talk to us regarding your needs

Good to know

Questions before you start.

How do we get our existing data in?

Import your employee data from Excel. We help with setup, data import and onboarding tailored to your organisation’s needs.

Can we cancel?

Yes. Monthly plans can be cancelled at any time and end with the paid month. Annual plans are prepaid for the year and include two months free.

How do we pay?

A payment card is required when you sign up. Your card is not charged during the 14-day free trial. Cancel before the trial ends to avoid a charge; otherwise, your selected subscription is charged after the trial.

What languages does the system support?

The interface is available in Lithuanian, English, Russian and Azerbaijani. Each organisation can also add the additional languages used by its international workers.

Can we export our data?

Yes. Export your data and generated documents at any time.

Where is our data hosted?

Your data is hosted in the EU, processed in line with GDPR, encrypted and backed up regularly.

How do we start?

Create your workspace and add a payment card to start your 14-day free trial. You can start immediately, with no sales call required.

Can you build something specific for us?

Yes. We can develop custom modules for special requirements. Scope and pricing are negotiated individually for each case.

Document templates and language variants

Documents: Document templates and language variants
1 / 6